Building a process doesn’t need to be complicated. In fact, keeping it as simple as possible is a much better approach. In this lesson, we’ll go over the 3 basic parts of a process and the 3 steps to building a process.
Once you start getting into the details of a process, it will naturally expand, like my sweat pants at Thanksgiving dinner.
Learn to build a basic process in 5 minutes:
The 3 parts of a process:
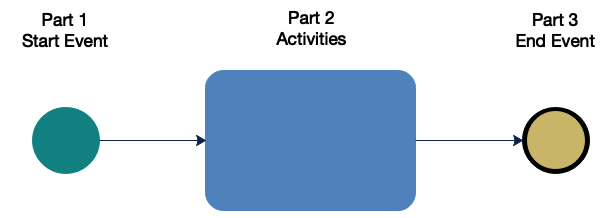
- Every process has a beginning. This is the “starting point”, the “trigger”, the “start event”, the “input” or whatever you’d like to call it. Basically, this is what kicks off the process.
- Every process has steps from beginning to end. Not all processes go in a straight line and the steps may include decisions, events and other actions.
- Every process has an end. This is the “end point”, then “end event”, the “output” or whatever you’d like to call this and it signifies the end of the process.
The 3 steps to building a process:
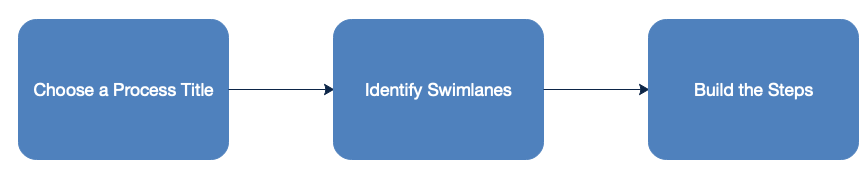
Step 1: Give your process a title.
Begin with a suitable title. For a high-level process, this could be a concept or company activity.
Examples: “ACME Customer Experience Journey”, “ACME Operations Manufacturing Process.”
For a more detailed process, it may be more suitable to use an activity description and/or action phrase. They often describe a specific task or activity.
Examples: “Create New Customer Account”, “Invoice Customer,” “Service Desk Intake Process.”
There’s no right or wrong here, just don’t mess it up – just kidding! And, it’s up to you if you’d like to add the word “Process” to the title or not but, keep in mind, this extends the title (and potentially the filename) on every process.
Choose a title that fits the process and keep the approach consistent. Also, if you need to prefix the process with a company name, a department or a function, remember to also keep that format consistent.
Be aware of the length of each process title and filename. This can lead to very long names which may present readability and/or file management issues later on.
I like to abbreviate my process prefixes, but that’s just me. So, for example, I may have several Accounting, Operations and HR processes, with subprocesses, and my naming conventions may look like this:
ACC-1.0 – Accounts Receivable
ACC-1.1 – Enter New Customer Account
OPS-1.0 – Order Fulfillment
OPS-1.1 – Order Intake
OPS-1.3 – Order Verification
HR-1.0 – New Hire Onboarding
HR-1.2 – Submit Payroll Forms
HR-1.5 – Conduct New Hire Orientation
Step 2: Identify the roles or departments that are responsible for activities within the process.
Will the specific actions be performed by various roles and departments or is this a higher-level process flow, independent of the specific roles?
It’s easier if there are no role because then you begin with a blank canvas and no swimlanes. Swimlanes on a process workflow help you identify which role is responsible for which action.
Here is a simple process without swimlanes:

Here is the same process with swimlanes:

You do not need to draw your connector lines (arrows) exactly like this. Use what is best for your situation and try to keep it consistent.
Step 3: Create the objects/steps and link them in a path.
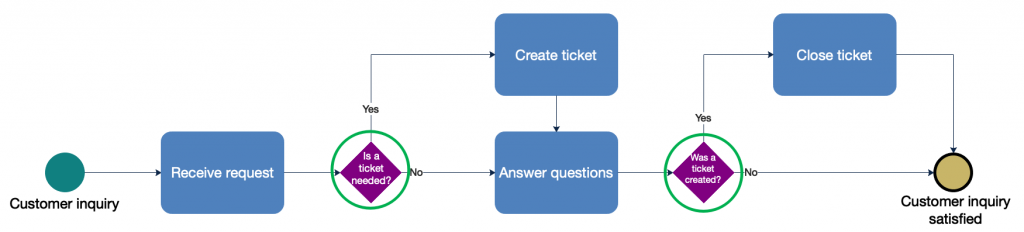
Identify the steps from the beginning to end. Each process will have a start event, an end event and steps in-between.
Choose short phrases for your tasks, begin each task with a verb and avoid the use of the word, “and”, when it combines verbs.


Use diamonds to indicate decision steps that may lead down one path or the other, as in:
And now you know how to build a basic process. Try something simple like mapping out the process for making coffee or ordering pizza.
Processes can become quite a bit more complex than this, obviously, and additional objects may be needed to indicate sub-processes, interrupting events, multiple paths that need to be followed in parallel, and so on. But that’s more complicated and you may need a process guru to help you if it’s more than the basics.
<shameless plug> I may be able to refer you to a good one. </shameless plug> 🙄😂
You can always leave a question or comment below and we’ll be happy to try to answer it for you.
Additional tips:
Here are a few extra tips that’ll have you mastering process maps in no time:
Draw your process maps on paper before using technology. It’s actually quicker and easier to use pen and paper. Drawing arrows, crossing things off, adding steps that were overlooked. Begin mastering the concept with pen and paper before you transition to technology. Once you have a firm grip on the approach, you can then begin using technology for your drafts.
Keep your process maps as simple as possible at first. Try not to overthink the objects, steps, lines and connectors. Get the core concepts and high-level steps identified and noted and try to avoid “rabbit holes” that have you chasing down multiple, detailed paths in all directions.
Keep the flow of your objects and decision outcomes as consistent as possible. Build your processes from left-to-right and top-to-bottom. If your “yes” decision paths tend to go to the right, try to keep them that way throughout. If your “no” decisions tend to go downwards, try to also keep them consistent. If you do have process with yes/no decisions in them, try to make the shortest path, from beginning to end, the “yes” path. We do this for readability and efficiency. If the “yes” path is the shortest path to the end of a process, it is more efficient and predictable for your users. We also follow this type of guidance for readability and error-reduction. If the flow is consistent, your users will pick up on that and you’re making it really easy to follow.
Avoid lines and connectors going in all sorts of directions and minimize overlapping lines as much as possible. Your goal is to create a clear path from start to finish, not to mesmerize and confuse! Make it as easy as possible to follow a consistent flow. When arrows are straight, and then curved and then going left, back, over and around, they become very difficult to follow and this create opportunities for human error rather than consistent outcomes.
—
Have questions? Need more information? Leave a comment or contact us and we’ll be happy to respond!
Comprehend. Reimagine. Outperform.
Alwin Kwan
Your Friendly Neighbourhood Process Consultant